 IMS5000 Manual
IMS5000 Manual
IMS5000 Manual
A fixture is a structure that attaches to the stage and helps position parts for marking. When using fixtures, it is important to consider:
(Jedec Tray)
(Auer Boat)
(Example of custom tray)
Note: only users of security level 3 or 4 can create new programs or fixtures.
Click on File → New → Fixture to open the Fixture Editor window.
For demonstration in the manual x (width) dimensions will be given first, y (length) dimensions will be given second, and z (height) dimensions will be given third.

Description
Input a detailed description that will appear to the right of the file name.
Origin
Designates the Fixture Origin. The reference is in inches from the upper left corner of the fixture to the world coordinate origin.
The world coordinate origin is an arbitrary point defined in the system set up. Which can be indicated by a physical mark on the marking surface. The default is 0.
Extent
The size of the fixture in inches in an x, y, z format. The z dimension is the highest point on the fixture without parts on it. If placing a part in the fixture adds height to the fixture, that dimension should not be indicated on the extent.
Location
Defines the coordinates of part locations on the fixture and the marking order. The first part to be marked will be listed first. The locations are in the coordinate format of x, y, X, Y where x, y is the upper left coordinate of the part locations with respect to the fixture origin. X, Y is the dimensions of the part location.
If you indicate 0, 0 for the dimensions of the part location, the system will automatically create the part location size to match the size of the part.
To indicate the part location coordinates, if the part locations are in a grid format, the easiest method is to click on Grid and enter inromation to have the locations assigned automatically. But if you have a non-symmetric layout, click on Insert to assign them one at a time. Or you can insert a location within an already specified list of locations by clicking on the location where you want to insert a location before and then click the insert button.
Insert
Click on Insert to specify a New Location. the New Location window will be displayed. Enter the new location and then click on OK.
Delete
Select a Location to delete and then click Delete.
Grid
Click on Grid to set up part location configuration.
With each entry space seperated values will automatically have a comma inserted.
Order
Indicates how may part locations across by how many part locations down (x, y) where x is 'parts across' and y is 'parts down'.
Origin
Refers to the grid origin, the reference in inches from the upper left corner of the upper left most part location to the upper left corner of the fixture in (x, y). For example if the first part location is 4" from the left edge and 2" from the top edge of the fixture, the origin would be (4, 2).
Location Size
The size of the part location in (x, y) format. If a part were 2" wide by 6" long, you would enter (2, 6). If the part is round or oddly shaped, use the greatest length.
Location Spacing
The distance from the upper left coordinates of a part location to the upper left coordinates of the next part location. For example, the x dimenstion is 2" plust the space between the part 0.5". So, the line spacing value would be 2.5".
If there is one row the Y value for spacing would be 6", the length of the part. If there were two rows with a 0.5" spacing the Y value would be 6.5".
Sequence
Click on the marking sequence desired whether it is left to right, top to bottom, etc.
The File Menu Provides the following options:
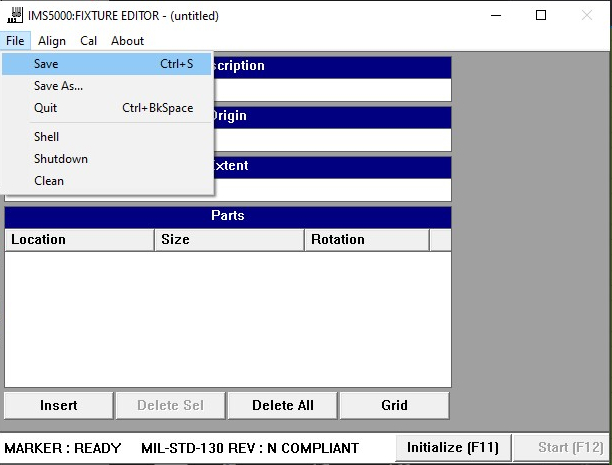
Save Ctrl+S
Allows for the saving of a new marking file or changes to an existing markings file.
Save as...
Saves changes under a difference marking file name. For example, if there is an existing template “Save As…” will allow creating a new and different marking file program.
“Save As…” will display the following message box, you will need to type a new name and then click OK.
Quit
Allows the user to exit the Program Editor and return the the File Window.
If a user tries to quit out on an unsaved marking file, a save prompt will ask the user if they would like to save before exiting.
Shutdown
Same details as in Getting Started
Clean
Same details as in Getting Started